1 – Maintenance
Monthly – Treat the HVAC condensate drain line of your unit and the line draining away towards the sewer, with either one cup of vinegar, one cap of bleach, or several drops of an antimicrobial soap or dish detergent.
Bi-Annual – If HVAC problems cause grief every summer no matter how conscientiously your system is maintained, it might be worth it to get a company to check your system every Spring and Fall, similar to regular car maintenance.
| Common cause of AC shutoff in the summer: | Typical at McGill Place: Float switch located in condensate line |
|
 |
Bi-monthly – Check and vacuum the air handler filter, more frequently if you have pets. Change out completely every 3-4 months.
Quarterly – Treat the HVAC drain line by pouring two quarts of hot water into the drain line access point. Then treat as noted for monthly drain maintenance above.
Annually – Change your thermostat batteries. This is a common cause of an HVAC system to stop running. Old batteries will corrode the thermostat terminals requiring the thermostat to be replaced.
Winter Months Heat Pumps- For Heat Pumps, do not move the thermostat setting lower when leaving during the day. (In general, heat pumps run most efficiently when kept at a steady temperature. Turning the thermostat down when you’re away or asleep may actually use more energy than leaving it on. This is because heat pumps have to work harder to return to the desired temperature than they do to maintain it.) For extended periods (e.g., more than 5 days), lowering the thermostat a maximum of 5 degrees is okay. If the thermostat heat setting is adjusted more than 2 degrees (typically), it causes the supplemental heat strips to turn on and increases your electricity consumption tremendously (e.g., 5 kWh per hour). This is not an issue in the cooling mode.
*To prevent freezing and bursting pipes, Community Governing Documents require the heat to be operational and in the “heat” mode during winter months with the thermostat setting not be set less than 55 degrees F.
DIY System Check-Up – Generally with good maintenance an HVAC system will not require annual or periodic maintenance. If you believe your system is not cooling or heating properly, you can measure the vent temperature using a touchless temperature taking device. Expect a 15-25 degree F cooler temperature than the outside ambient temperature. Yes, 15-25 degrees F is not much of a differential and it is why the HVAC system has supplemental heating. On the rare really cold days (e.g., 35 degree F), the best a heat pump can heat is 60 deg (35+25); therefore, the supplemental heat strips make up the difference or when the compressor stops for some reason to provide backup (i.e., “emergency”) heat.
Heat Strips – Pay attention in winter months for two things. First, ensure that your outside unit does not get covered with ice. This means the system needs servicing and will not heat the unit efficiently and optimally. As a temporary solution, sometimes the HVAC system can be placed in cooling mode for a few minutes to melt the ice and then returned to heating mode without further issue. If the problem persists, servicing is required.
Second, ensure that on the face of the thermostat that the supplemental or emergency heat is not being used on mild days only being used when expected (e.g., temps are above 45 degrees). Supplemental heat usually identified by the letters AUX, EMT, or Stage 2. If supplement heat is active continuously or when not expected, consult with an HVAC vendor to troubleshoot the system.
Checking the Freon – Before having an HVAC technician connect gauges to the outside unit freon connections, have the technician test the cooling or heating temperature on the inside at a vent. Anytime the valves on the heat exchanger/compressor are manipulated, there is a risk of having the freon leak down in the system. The valves are similar to the air valve on an automobile tire, but air is cheap. Checking the delivery air temperature at a vent is a quick test for whether the system is cooling or heating within an acceptable range. At the writing of this guideline, an R410-A freon recharge can range from $200-$700.
[1] It is the Association’s understanding that air handlers in community units do not have a flue to vent gas furnaces through the roof. Residents who wish to convert to gas are required to obtain Association approval and residents are responsible for the cost of flue installation, in which unit residents may be required to use the Association vendor to ensure the roof warranty is not voided.
[2] 1.0 ton is equal to 12,000 British Thermal Units (BTU) and cools approx. 600SF
[3] A VTAC is a type system typically found in the wall corner of a hotel room nearest an exterior wall for venting. Installation is permitted through an exterior wall with lap siding (not brick) with ACC approval to do so.
[4] A PTAC requires mounting on the interior of an exterior wall so that it can be vented to the outside. Basements in the community townhomes are not conducive to this installation and it will not be approved by the Association.
[5] The P-trap is similar to what is found under a kitchen or bathroom sink. It looks like the letter “P” when turning your head to the side.
2 – New HVAC
Your Association recommends considering this guideline when changing out your Heating Ventilation and Air-Conditioning (HVAC) system(s). The goal of the guideline is to provide insight into:
- Properly sizing a new high-efficiency system, ensuring the vendor installs it correctly, and routes the drain line appropriately.
- The guideline assumes that the unit has an electric “heat pump” and not a gas furnace.[1]
- This guideline does not provide any recommendations on manufactures or vendors.
- Residents may consider available sources like, for example, Consumer Reports for appliance ratings and recommendations and social media for vendor recommendations such as Nextdoor and Yelp. Other residents are also a good source of information.
SIZING – Main Floors
Unfortunately, many vendors like to over-size HVAC units causing homeowners to spend more than they need to for a new system. Also, vendors tend to push the standard 2.0 ton[2] HVAC system because they are in wide availability, the most common size, and provide a better profit margin to the vendor. Sizing the HVAC system is most accurately done by a professional (not HVAC technician) using a process called Manual “J.” The process determines the heat loss and heat gain of the unit and the desirable ton size of the replacement HVAC. Check with your local energy provider (e.g., Georgia Power) to see if they provide an “energy audit” that includes a Manual-J calculation. A provider may charge a nominal fee to do an energy audit and/or calculation.
As a general rule, an older (like McGill) or poorly insulated home needs about 1.0 ton per 600 square feet (sq ft) of cooled or heated space.
- A new home with all the up-to-date insulated attic, doors, and windows with about 1,200 sq ft can be cooled and heated using as little as a 1.0 ton HVAC system.
- While these are generalities, main floors of units are sized 750-1,300 sq ft and coupled with the fact that units don’t have windows on all four walls, share two common walls, and may not have an attic, the heat loss and gain is significantly different from a single-family home that has many windows and an attic.
- Therefore, a 1.5 ton HVAC system is more than adequate for cooling and heating main floors of units 750-1,300 sq ft in area.
Don’t be surprised when an HVAC vendor proposes a 2.0 ton system. These are common and generally give the best price point for homeowners and vendor profit margin, they are technically oversized for McGill Place units. Note that 1.5 ton units are available and are matched better to the main floor of units that are 750-1,300 sq ft in area, a vendor may charge slightly more for the smaller units.
Getting the ton size to match its ability to cool and heat a space is important. You will spend less money on electricity and you will feel comfortable.
- Smaller tonnage runs the air over the coils more frequently thus removing humidity as well as uses less electricity.
- Humidity can cause a “wet sock” odor and can lead to mildew growth, which is unhealthy.
- Humidity also holds heat and the temperature has to be raised or lowered more than normal to achieve the desired comfort level.
- Constantly adjusting the temperature for comfort can lead to spending more on electricity because of the larger compressor in the oversized HVAC system .
SIZING – Basements
For a townhome with a small basement (e.g., 400-500 sq ft), a 1.5 ton and greater HVAC is definitely oversized for the space being conditioned due to only one window and door. Alternatively, owners should consider a “Mini-Split” or Vertical Terminal Air-Conditioner (VTAC),[3] but not a Packaged Terminal Air-Condition (PTAC).[4]
Mini-splits are very similar to traditional HVAC systems having a traditional outdoor heat exchanger (i.e., compressor and coils) and an inside wall air handler. Mini-splits cannot be hidden in a closet because the air handler has to be mounted on an interior wall of the room being conditioned; however, they can have multiple interior air handlers for multiple rooms.
On the other hand, a VTAC is a self-contained system with no outside equipment. The difference is that a VTAC can be mounted in a closet that has an exterior wall, hidden out of view, and its ducts may be attached and extended to additional rooms through the ceiling.
An owner or resident wishing to install a new HVAC system (i.e., not already existing on the Common Elements), whether it is a traditional HVAC, mini-split, or VTAC; must submit an ACC request for approval by the Association prior to making any modifications. Both the mini-split and VTAC systems offer capacities as low as 0.75 ton, which is a perfect size for the amount of space to be conditioned in a townhouse basement. Also, these systems specify how much humidity they are capable of removing on an hourly basis.
Don’t forget that new HVAC systems must have a dedicated electric branch circuit that only serves the HVAC system and the City of Atlanta requires permitting of new systems.
AIR FILTRATION
- When replacing the HVAC system, consider changing the lower plenum or base box for two reasons.
- First, it is an opportunity to have the vendor place the code required condensate drip pan underneath the air handler (the part that blows the air through the duct system). A good vendor will quote and install the required drip pan, if missing, which requires the base box to be removed anyway.
- Second, removing the current base box may allow you to go to a 4 to 6 inch filtration system, which are more efficient and provide longer periods (4-6 months) between filter replacements.
- Another popular option is adding ultraviolet (UV) lighting to purify the air. Given the recent issues with viruses and bacteria, a UV light might be worthwhile.
DRAIN PLUMBING
This is one of the most important components of the HVAC system and is often the most overlooked and ignored component when an HVAC system is replaced.
- Installation technicians will install the drain so that it works, but often leave it unmaintainable or even worse, blocking the ability to change the air filter.
- A poor drain installation will most likely result in a future service call and more money for the vendor.
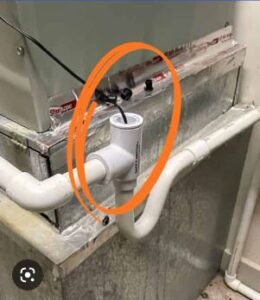
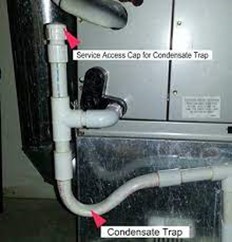
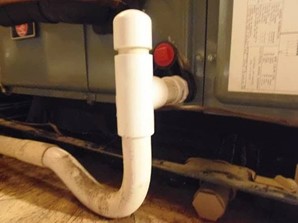
- The drain line must have a “P” trap[5] to prevent the air handler from drawing sewer gas from the main drain line connected to the sewer system due to low pressure created by the air handler fan circulating air through the system.
- The plumbing has to be installed so that the owner can not only treat the pipe with anti-bacterial solutions, but also pour water into the pipe to clear mild clogs or to insert a fish tape to clear more difficult clogs.
- Below are pictures of a properly and improperly installed drain and P-trap.
| PROPER INSTALLATION – Does not block air filter and P-trap has a cap for servicing and flushing the drain line. | IMPROPER INSTALLATION – P-trap is correct, but blocks air filter access. In fact, this unit does not have an installed filter and the slot is not properly sealed. |
 |
 |
DRIP PANS
1. Drip pans are required by code.
-
- Not only should the air handler have one under its base box, it should also have a float switch mounted to the edge of the pan.
- The purpose of the float switch is to stop the compressor from running and causing the HVAC to continue producing condensate (i.e., water) in the event of a clogged drain line.
- If the drain line clogs and causes the condensate to build up internally in the air handler, it will overflow into the drip pan.
- As the pan fills with water, it will cause the float to rise and trip the switch, thus turning off the compressor.
- Drip pans also prevent condensate from reaching lower units and causing property damage.
2. Alternatively, requiring no pan, some float switches are mounted integral with the condensate drain line system. These are also effective when installed properly. Below are examples of float switches.
-
- If your AC float switch trips your air conditioning mysteriously stops…
- This is because water has built up in the condensate line high enough to almost flood and flips the switch.
- Remove the blockage with pressure and allow the water to flow freely in your condensate drain system.
- Monthly – Treat the HVAC drain line with:
- either one cup of vinegar, one cap of bleach, putting vinegar regularity in the line discourages mold.
- or several drops of an antimicrobial soap or dish detergent.
- Allowing air in the system prevents the vacuum effect (also the purpose of a vent stack in plumbing).
| Float Switch in complex unit | Float switch located in condensate line typical at McGill Place |
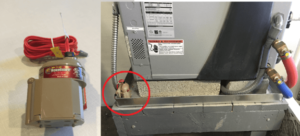 |
|
VENDORS
Your Association is not permitted to recommend vendors to residents. In the case of an HVAC vendor, we do not have a relationship with any HVAC vendors; therefore, we recommend talking with your neighbors, friends, or family; posting recommendations on line; and/or utilizing resources like Yelp and the Better Business Bureau. We recommend that whomever you choose that they are licensed and carry liability insurance for your protection. Note, any damages to the Common Elements caused by visitors, guests, residents, etc. (including vendors) is ultimately your responsibility under the governing documents.
CHECKLIST
- Get estimates (e.g., outside unit, air handler, filtration, base box, UV light, drip pan, float switch, new thermostat, etc.)
- Choose your vendor
- Schedule the work
- Provide your reserved parking space for the plumber
WHAT TO COVER WITH YOUR HVAC TECH BEFORE WORK
● Check that your plumber licensed and insured
● Plumber must take all refuse off site
● Confirm the correct size and paired indoor and outdoor unit with the vendor. This is easily accomplished by looking at the model number on the exterior heat exchanger/compressor. Look for a number in the model number that is divisible by 18, 24, 30, or 36. Note, you should only find an 18 or 24. Divide the number by 12 (i.e., 12,000 BTU/ton). An 18 means a 1.5 ton HVAC unit. The equipment documentation will state the matching indoor and outdoor systems for compatibility.
AFTER YOUR SYSTEM IS REPLACED AND WHILE THE HVAC TECH IS STILL ONSITE
- Have the technician demonstrate the system works in both cool and heat mode. When in heat mode, increase the thermostat several degrees (usually 2-5 degrees above ambient temperature) to cause the heat strips to turn on. Heat strips are commonly called “auxiliary,” “emergency,” or “supplemental” heat.
- Have the technician demonstrate the float switch works properly by turning on the system and confirming the outside heat exchanger/compressor is running. Loosen the float switch and turn it upside down to cause the float switch to “trip” and stop the outside heat exchanger. Confirm the outside exchanger/compressor stopped running (technician do make wiring mistakes).
- Have the technician demonstrate the filter is installed and easy to remove and replace.
- Have the technician demonstrate the drain line has a P-trap and a cap that can be removed to treat the drain line and P-trap periodically.