Your Association recommends this guideline in preparing to replace your unit main water valve. Units are generally equipped with a knob type or “gate” valve, unless a prior resident replaced it with the current industry standard “ball” valve (i.e., lever type).
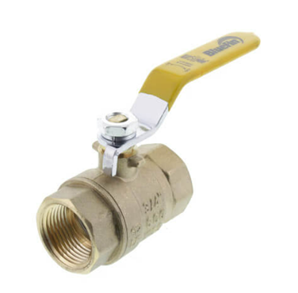
This is a Ball Valve which is much more efficient than a gate valve shown below.
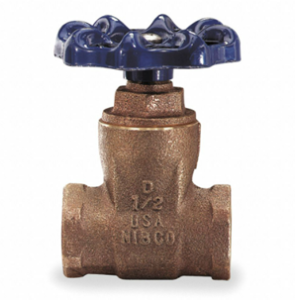
Gate Valves were used in the 198o’s. It gets leaky with age and today a more efficient version called a ball valve is utilized.
The unit main water shut off valve is generally located on the wall directly behind and above the water heater. Note that the pipes above the water heater may be hot. If your unit has a knob type shut off valve, your Association strongly recommends you replace it with the lever type (i.e., ¼ ball valve). The reason is a ball valve or “gate” valve is notorious for not completely shutting off the water and for getting stuck in the open position making it difficult or impossible to shut the valve. Also, the gate valve stem tends to leak as the valve ages regardless of whether the valve is open or closed, and exercising the valve may cause it to begin leaking. A ball valve is easier and quicker to turn on and off than a gate valve and will not have the leaking stem issue.
HOW TO TEST YOUR SHUT OFF VALVE
It is a good idea to exercise the unit main water shut off valve, if it’s a “gate” valve, at least once a year. A good practice is also to shut off your water if you plan to take a trip. When exercising the valve for the very first time or for the first time in a long time, have a plumber on call in case they are needed. Also, don’t test the valve around holidays or weekends as plumbing repairs tend to be more expensive and more difficult to get a technician out on weekends, holidays, and afterhours.
- SCOUT OUT THE OUTSIDE TURNOFF FOR THE WHOLE BUILDING- IT IS THE BLUE REFLECTOR – Before starting any plumbing venture, go outside your building and locate the blue reflector. It is generally on the front of the building about midway and four feet above the ground. This is the location of the building’s main water shut off valve. Now locate the valve box in the ground. It will be one to three feet from the reflector. The exception is the building for Units 420-458, which is about eight feet. The box may be obscured by Pine straw or a bush. Open the box and ensure you can see the valve in case you need to turn off the water in an emergency. If this is a planned turnoff give a 48 hour warning to the association.
- CLOSE THE INSIDE TURNOFF JUST FOR YOUR UNIT (if not changed out will be a gate valve)– Close (clockwise, righty tighty) as tightly as possible by hand only. Check the stem of the valve, which may be hidden by the wall board, for dripping or leaking. If the stem is leaking, go open the valve again. The valve needs replacing.
If you are unable to stop the stem from leaking, contact your plumber. If you had to open the valve, be sure to close the valve one full turn to “unseat” the gate. Otherwise you run the risk of the valve getting stuck in the open position. This will not affect your water pressure or flow. - IF ALL WENT WELL WITH CLOSING THE VALVE (TURNING OFF YOUR WATER), NOW EMPTY THE WHOLE SYSTEM OF WATER AT THE LOWEST GRAVITY AREA. The lowest point in the plumbing system may be your tub, but if you don’t have a tub, open the sink valve(s) in the kitchen and bath room. Allow about 15-20 minutes for the water to drain from the system. If the water does not completely stop with the fixtures open, the Association strongly recommends you consider replacing the unit main water shut off from a gate valve to a ball valve. Close all fixture valve(s) and go to the OPEN section below.
- TURN ON YOUR WATER AGAIN – After the test, open (counterclockwise, lefty loosey) completely, and then CLOSE the valve one full turn to “unseat” the gate. Otherwise you run the risk of the valve getting stuck in the open position. This will not affect your water pressure or flow. Return to the fixtures that were previously open and turn on the water SLOWLY to allow the air to escape the pipes. This will prevent you from being surprised unexpectedly later.
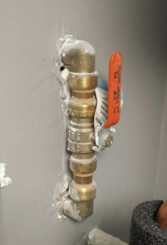
Newly installed Ball Valve.
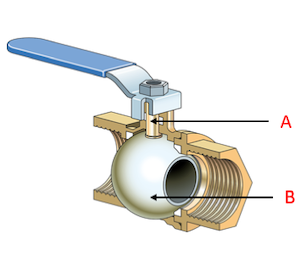
Ball Valve working parts make it simple and efficient. 1/4 easy turn completely blocks water flow 100%.
CHANGING THE VALVE
The best time to change a “gate” valve to a “ball” valve is when changing the water heater (see your Association’s Guideline – Water Heater Change Out). You will get a better price because the water heater must be removed and out of the way for the plumber to access the wall.
What to expect: You might find your gate valve is almost flush with the wallboard making it difficult to grip. When the plumber replaces the valve with a ball valve, the typical method is to bring the plumbing outside of the wall (see picture at left). This provides stability for the plumbing, especially plastic CPVC. Also, plumbers will not replace the wallboard, so you will have to arrange for a general contractor to repair the wall.
If you are replacing your unit main water valve, this requires a building water outage. The water outage must be scheduled with the Association at least 48 hours in advance of the scheduled work. The window of the outage may be between 10:00 a.m. and 3:00 p.m.
VENDORS
Your Association is not permitted to recommend plumbing vendors to residents; however, the Association will provide you the names of plumbing companies it uses to service the communities by contacting the Board or management company. You are welcome to use the Association plumbers knowing that we require them to be licensed and carry at least $1M in liability insurance. You are also encouraged to consider other small plumbing companies since the Association plumbing firms typically focus on commercial customers. It is highly recommended to check around and obtain estimates as costs can vary widely.
CHECKLIST
- Get estimates
- Choose your vendor
- Schedule the work
- Contact the Association 48 hours or more in advance of the work to inform residents of water outage to the building
- Locate the blue reflector and valve box for your benefit and the plumber
- Confirm you got notice of the building water outage (ensures the message went out)
- Provide your reserved parking space for the plumber
WHAT TO COVER WITH YOUR PLUMBER BEFORE WORK
- Check that your plumber licensed and insured
- Plumber must take all refuse off site
- The plumber is NOT to “pop-open” the water heater Temperature Pressure Relief (TPR) valve to allow the air to escape the plumbing system more quickly. It may cause flooding and water damage in either:
- your unit if plumbed to the drain behind the washer, or
- other units due to the TPR piping being interconnected to other units
| GATE VALVE | BALL VALVE (¼ turn) |
|
|